TEACHER STEP 3
STEP 1
Professional Learning & Preparation
STEP 2
Phase 1 – High Direction
STEP 3
Phase 2 – Mentored Exploration
STEP 4
Phase 3 – Independence
STEP 5
Presentation & Celebration

Goals for STEP 3
- REVIEW about ‘Effective Use of Mentors’
- Conduct BRIEFING SESSION for Mentors/MySTics before School Visit #1
- Facilitate INTRODUCTION of student groups with Mentors/MySTics
- Facilitate Visit #1: FOCUS/TESTABLE QUESTION selection, VARIABLE selection, PREDICTION / HYPOTHESIS, METHOD selection, EQUIPMENT selection with student groups and Mentors/MySTics
- Facilitate PILOT INVESTIGATION with student groups
- Facilitate Visit #2: ACTUAL INVESTIGATION with student groups and Mentors/MySTics
Scroll down for more information.
STEP 3 – Plan Ahead
- MENTOR/MySTic BRIEFING SESSION: conduct
- MENTOR/MySTic VISIT #1: prepare for and facilitate
- INVESTIGATION PLAN: ensure student groups have a ‘testable question’ and know what to do (once the mentors leave)
- PILOT INVESTIGATION: facilitate after Visit #1
- MENTOR/MySTic VISIT #2: prepare for and facilitate
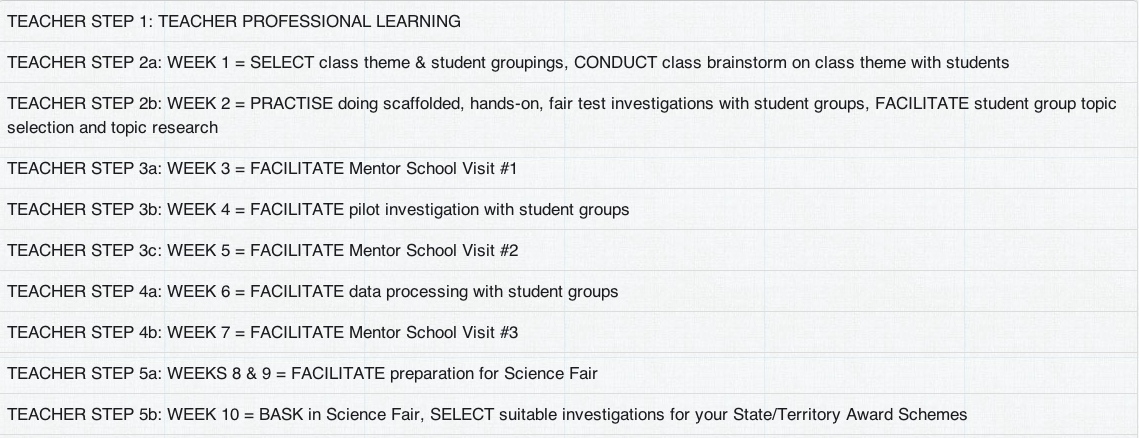
STEP 3 covers WEEK 3, 4 & 5 of Implementation

STEP 3 – Information
Mentor/MySTic Briefing Session
Inviting mentors/MySTics into the school/your classroom for a short BRIEFING SESSION before the first school visit has many benefits for participants such as they:
- gain awareness of the physical layout of the school and classrooms,
- have a chance to ask questions about the program, their role, the class theme, student needs … ,
- participants meet teachers and other Mentors/MyStics who will be working with primary students, which promotes a sense of belonging and focus around the purpose for them coming into the school,
- participants gain awareness of any school requirements related to working with children, signing in when arriving at the school etc.
An example of a teacher-generated Mentor Briefing Invitation is available via TEACHER STEP 1: Resource Button ‘1.9 Mentor Briefing Invitation’.
Conduct the Briefing Session BEFORE the first school visit in WEEK 3 of Implementation.
Mentor/MySTic Visit #1
Here is a list of things that you need to do in PREPARATION for Mentor/MySTic Visit #1:
- Dates and Times for the 3 School Visits should be in place and have been communicated to Mentors/MySTics as well as the School Office.
- Review the Resource: ‘3.1 Effective Use of mentors’ to fine tune your planning for Visit #1.
- A ‘NSW Working with Children Check’ (= Resource 3.2) should have been completed by adult mentors (over 18) but ONLY IF THE SCHOOL REQUIRES IT. MyScience mentoring does NOT require the check because the number of contact hours with children is too low and because the teacher is always present in the classroom when mentors are there.
- BRIEF your students on how to interact with Mentors/MySTics.
- READ the teacher-generated notes/ideas at ‘3.3 Preparing for Visit #1’.
- READ ‘3.4 Student Planned Investigations’ to gain information.
Here is a list of things that you need to do DURING Mentor/MySTic Visit #1:
- WELCOME Mentors/MySTics into your classroom. Mentors have taken time out from their busy schedules to voluntarily support both you and your students. These visitors may be quite worried about coming into a primary school classroom and will need your support to feel comfortable and at ease.
- Allocate up to 6 primary students with an adult mentor, and up to 4 primary students with a MySTic. Primary students should be grouped in pairs or threes, with each group working on a different, but related topic area within the class Theme.
- Mentors need time to get to know their students. Put aside the first twenty minutes of the first session for mentors to talk about how they developed an interest in science, how they use(d) science in their work, the fact that they studied science subjects in high school and then at university – and what these experiences were like.
- By the end of Visit #1 student groups should have recorded in their LogBooks:
- a clear idea of their QUESTION,
- how they will CONTROL THE VARIABLES,
- a PREDICTION OR HYPOTHESIS,
- the METHOD OR STEPS that they will follow, and
- the EQUIPMENT that they will require.
Use the RESOURCE BUTTONS (3.5 – 3.12) for additional information about how to support your students and mentors in this phase of MyScience.
Student Investigation Plan
- Student groups need a clear plan for how to do their investigation. See Resource Button ‘3.4 Student Planned Investigations’.
- By the end of the Mentor Visit #1 students need to have a TESTABLE QUESTION (see Resource Button ‘3.5 Testable Questions’) for information.
- There are many SCAFFOLDS/PROFORMAS in ‘Resources’ that can be used to support student planning such as:
- ‘3.6 Classroom Posters (via TEACHER STEP 1)’
• ‘3.7 Student Scaffold #1’ = BASIC
• ‘3.8 Student Scaffold #2’ = ADVANCED - Additional information can be found at:
• ‘3.9 Predictions & Hypotheses’
• ‘3.10 Equipment’
Student Scaffolds
- There are many SCAFFOLDS/PROFORMAS in ‘Resources’ that can be used to support students to plan and conduct scientific investigations such as the following:
- ‘3.6 Classroom Posters (via Step 1)’
- ‘3.7 Student Scaffold #1’ = BASIC
- ‘3.8 Student Scaffold #2’ = ADVANCED
- When students use a SCAFFOLD the final WRITTEN REPORT is much EASIER TO COMPLETE.
- Additional information can be found at:
- ‘3.9 Predictions & Hypotheses’
- ‘3.10 Equipment’
Student Assessment
Information about STUDENT PROGRESS in the steps of Working & Thinking Scientifically can be read at:
- ‘3.11 Assessing Student Inquiry Skills’.
This document presents stages of learning related to students’ ability to:
- Raise Questions
- Predict
- Fair Test
- Measure
- Develop Tables
- Construct & Use Graphs & Charts
- Explain Results
- Evaluate Investigations
Information about STUDENT SCIENTIFIC ATTITUDES can be read at:
- ‘3.12 Assessing Student Attitudes’.
This document presents stages of learning related to students’ scientific attitudes such as:
- Curiosity
- Respect for Evidence
- Flexibility
- Sensitivity
Pilot Investigation
- This is where the fun begins!
- Students LOVE this part of Working and Thinking Scientifically.
- A trial run (= PILOT) of the science investigation flushes out unexpected and unforeseen issues around teamwork, the method, equipment, recording data etc.
- Students can report what happened in their pilot investigation to their mentors at the SECOND school visit and ask for advice.
- If you can get ONLINE COMMUNICATION up and running then students could take video clips or images and upload these, or even communicate in real time if this can be arranged to suit participants’ schedules.
- Mentors are NOT expected to be constantly online responding to multiple questions
from every group member. One group member could be responsible for gathering the
group’s questions and sending them (email/upload to a wiki) to their mentor. The
mentor could then respond with answers to the questions within an agreed time frame. - Alternatively, you may prefer to have all questions and answers travel through you.
- The pilot investigation may provide a set of usable data, but more likely it will be a practise run for the ‘real thing’ in Mentor Visit #2.
Mentor/MySTic Visit #2
- There will be LOTS of activity during the SECOND SCHOOL VISIT. Mentors/MySTics provides a valuable pair of hands and an important source of information.
- Students should have performed some of their data collection (some of the repetitions) before the mentor visit in their PILOT INVESTIGATION.
- Students need to take care that they make accurate measurements, record their data, and perform enough repetitions to ensure a reliable data set. The MINIMUM number of repetitions should be three to five.
- Students are likely to be quite excitable due to:
- the presence of Mentors/MySTics,
- performing hands-on activities, and
- possibly being located outdoors.
- SAFETY AWARENESS is crucial. Remind students to WALK, TAKE TURNS, REMAIN CALM, and USE QUIET (indoor) VOICES.
